- How to Extract Audio from Video file using ffmpeg

FFmpeg is a complete solution to record, convert and stream audio and video. It is a command line tool to convert one video file format to another. It also supports grabbing and encoding in real time from a TV card. Several FrontEnds/GUIs available like WinFF, Super, Avanti, AutoFF, Xpegt, GVC.

You can easily extract audio from video files such as avi, mpg, even flv into mp3 uses ffmpeg. You can even record online stream into mp3, such as stream from radio cast.

The audio component can be extracted to an mp3 using floowing command (from the command line Terminal). (This will work for any type of video file, not just Flash.)
ffmpeg -i video.flv -ab 160k -ac 2 -ar 44100 -vn audio.mp3
-i indicates the input
-ab indicates the bit rate (in this example 160kb/sec)
-vn means no video ouput
-ac 2 means 2 channels
-ar 44100 indicates the sampling frequency.


See FFMPEG docs for more info


source:http://linuxpoison.blogspot.com/2010/04/135781677510604.html

tutorial - Uget - A complete Download Manager for Linux / Windows

Uget is a download manager that uses GTK+2 and libcurl. It allows you to classify downloads, and allows you to import downloads from HTML files. Every category has an independent configuration that can be inherited by each download in that category.

Uget has many features like :
  * Free (as in freedom , also free of charge) and Open Source.
  * Simple , easy-to-use and lightweight.
  * Support resume download , so if your connection lost you don’t need to start from first.
  * Classify downloads , and every category has independent configuration and queue.
  * Queue download.
  * Integrate with Firefox through Flash-got plug-in.
  * Monitoring clipboard.
  * Import downloads from HTML file.
  * Batch download , you can download many files has same arrange , like file_1 file_2 …. file_20, you don’t need to add all links , just one link and changeable character.
  * Can be used from command line.

Installation:
DEB package for Debian-based distributions (Debain, Ubuntu, etc) - here
RPM package for RPM-based distributions (RedHat, Fedora, etc) - here
EXE for Windows XP / Vista / Win 7 , without GTK+ , you have to download GTK+ for windows


Free, facebook, tips, Links, blogging, Downloads, Google, facebookTips, money, news, apps, Social, Media, Website, Tricks, games, Android, software, PIctures, Internet, Security, Web, codes, Review, bloggers, SAMSUNG, Worldwide, Contest, Exitic, Phones, facebookTricks, hacking, London, Olympics, SEO, Youtube, iOS, Adsense, gadgets, iPHONE, widgets, Doodle, twitter, video, Deals, technology, Aircel, Airtel, iPAD, Angry, Birds, BSNL, TechLife, GMAIL, Idea, Microsoft, SmartPhones, Stress, Buster, Windows, Yahoo, Infolinks, Nokia, Scam, Uninor, browsers, Amazon, Euro, CUP, Chat, IDM, JOBS, Modem, Music, Reliance, Results, SSC, Tata, Docomo, bing, freebie, mobile, placements, AIEEE, AlertPay, Chrome, College, Competetive, Exam, Dehradun, Extension, FireFox, GPRS, HTC, IMPACT, Info, MTS, Mark, Zukerberg, Paypal, Promotional, Post, Torrent, UTU, Unlocking, VodaFone, Wall, Paper, apple, books, engineering, iCAR, iTunes, pinterest, rovio, AVG, Admit, Card, Adobe, Affiliate, Marketing, Akhilesh, Amul, Girl, BlackBerry, ChromeBook, Clixsense, Coupon, Digitallife, Discovery, Emoticons, Festival, GATE, GIMP, Income, Tax, International, JSS, JailBreaking, Kindle, Linux, Local, MAX, PAYNE, Mac, Mango, Memory, Speed, Nexus, Online, Shopping, Raakhi, Report, Rising, Stars, Sample, Science, Sony, Syllabus, TabletBooK, Teamviewer, Templates, Dark, Knight, Rises, USA, UPMT, Virgin, Xperia, ZTE, challan, counselling, course, btech, funny, iMOVE, registration

source:http://linuxpoison.blogspot.com/2010/03/13578175714172.html

tutorial - iScanner - Detect and Remove Malicious code from your webpages

iScanner is free open source tool lets you detect and remove malicious codes and web pages viruses from your Linux/Unix server easily and automatically.

This tool is programmed by iSecur1ty using Ruby programming language and it's released under the terms of GNU Affero General Public License 3.0.

iScanner Features:
  * Detect malicious codes in web pages. This include hidden iframe tags, javascript, vbscript, activex objects and PHP codes .
  * Extensive log shows the infected files and the malicious code.
  * Send email reports.
  * Ability to clean the infected web pages automatically.
  * Easy backup and restore system for the infected files.
  * Simple and editable signature based database.
  * Ability to update the database and the program easily from dedicated server.
  * Very flexible options and easy to use.
  * Fast scanner with good performance.

Installation:
Download iScanner - here
Extract the package to some other directory - tar -zxvf iscanner.tar.gz

You don't have to install iScanner on your machine to be able to use it. The program is portable and doesn't require any external libraries, you just need to have Ruby installed on your machine then you can copy iScanner's folder to '/etc' or any other directory and use it directly from there.

Using iScanner:
-f :Use this option to select the folder you want to be scanned.
# iscanner -f /home/user
 
-m :With this option you can tell iScanner to send a copy of the infected log to selected email address:
# iscanner -f /home/user -m email@example.com
-c :This option will remove the malicious code from the infected files with out deleting the infected files. Before using this option make sure to check the infected log to know what iScanner will remove from each infected file.
# iscanner -c infected.log
There are many more useful option, please check the iScanner help.
You can add iScanner to the cron jobs to make it scan you server every 24 hours and send the infected log to your email address.

Secure your stored computer files with dependable spyware protection and a firewall protected Apple operating system.


Free, facebook, tips, Links, blogging, Downloads, Google, facebookTips, money, news, apps, Social, Media, Website, Tricks, games, Android, software, PIctures, Internet, Security, Web, codes, Review, bloggers, SAMSUNG, Worldwide, Contest, Exitic, Phones, facebookTricks, hacking, London, Olympics, SEO, Youtube, iOS, Adsense, gadgets, iPHONE, widgets, Doodle, twitter, video, Deals, technology, Aircel, Airtel, iPAD, Angry, Birds, BSNL, TechLife, GMAIL, Idea, Microsoft, SmartPhones, Stress, Buster, Windows, Yahoo, Infolinks, Nokia, Scam, Uninor, browsers, Amazon, Euro, CUP, Chat, IDM, JOBS, Modem, Music, Reliance, Results, SSC, Tata, Docomo, bing, freebie, mobile, placements, AIEEE, AlertPay, Chrome, College, Competetive, Exam, Dehradun, Extension, FireFox, GPRS, HTC, IMPACT, Info, MTS, Mark, Zukerberg, Paypal, Promotional, Post, Torrent, UTU, Unlocking, VodaFone, Wall, Paper, apple, books, engineering, iCAR, iTunes, pinterest, rovio, AVG, Admit, Card, Adobe, Affiliate, Marketing, Akhilesh, Amul, Girl, BlackBerry, ChromeBook, Clixsense, Coupon, Digitallife, Discovery, Emoticons, Festival, GATE, GIMP, Income, Tax, International, JSS, JailBreaking, Kindle, Linux, Local, MAX, PAYNE, Mac, Mango, Memory, Speed, Nexus, Online, Shopping, Raakhi, Report, Rising, Stars, Sample, Science, Sony, Syllabus, TabletBooK, Teamviewer, Templates, Dark, Knight, Rises, USA, UPMT, Virgin, Xperia, ZTE, challan, counselling, course, btech, funny, iMOVE, registration

source:http://linuxpoison.blogspot.com/2010/03/135781757116801.html

- Linux Family Tree

A Linux (distro) family tree by Ian Murdock (current version: 0.90)


source:http://linuxpoison.blogspot.com/2010/04/135781677513496.html

- Using “at” command to schedule jobs in Linux

At allows fairly complex time specifications, extending the POSIX.2 standard. It accepts times of the form HH:MM to run a job at a specific time of day. (If that time is already past, the next day is assumed.)

You may also specify midnight, noon, or teatime (4pm) and you can have a time-of-day suffixed with AM or PM for running in the morning or the evening. You can also say what day the job will be run, by giving a date in the form month-name day with an optional year, or giving a date of the form MMDDYY or MM/DD/YY or DD.MM.YY.

The specification of a date must follow the specification of the time of day. You can also give times like now + count time-units, where the time-units can be minutes, hours, days, or weeks and you can tell at to run the job today by suffixing the time with today and to run the job tomorrow by suffixing the time with tomorrow.

The superuser may use these commands in any case. For other users, permission to use at is determined by the files /etc/at.allow and /etc/at.deny.

If the file /etc/at.allow exists, only usernames mentioned in it are allowed to use at.

If /etc/at.allow does not exist, /etc/at.deny is checked, every username not mentioned in it is then allowed to use at.

If neither exists, only the superuser is allowed use of at.

An empty /etc/at.deny means that every user is allowed use these commands, this is the default configuration.

Examples of using at command:
:~ # at 12:00
warning: commands will be executed using /bin/sh
at> echo "At example" > /home/nikesh/at.example
at>
job 2 at 2010-04-05 12:00
:~ #
Use atq to know the current jobs in queue. Jobs that are running have a status as” =” and jobs to be scheduled have a status “a” .The displayed output is the format 

# atq
1       2010-04-05 12:00 a root
2       2010-04-05 12:00 a root


source:http://linuxpoison.blogspot.com/2010/04/13578167758609.html

- How To Convert PDF files to HTML file - pdftohtml

pdftohtml converts Portable Document Format files to HTML. This release converts text and links. Bold and italic face are preserved, but high level HTML structures (like lists or tables) are not yet generated. Images are ignored in the current version (but you can extract them from the pdf file using pdfimages, distributed with xpdf).

Installation:
OpenSuSe user can install pdftohtml using "1-click" installer - here

Using  pdftohtml:
pdftohtml runs from the command line with various options. The basic form of the command is:
pdftohtml [pdf file name]
This command gives you a simple HTML file suitable for reading or copying the textual content of the PDF file. You can actually grab the text from your browser and paste it into other applications.

If you want to see graphics, you'll need to use the -c (as in "complex") option:
pdftohtml -c [pdf file name]
This option produces individual HTML files, one for each page of the PDF file, with the PNG references mixed in. The graphics in the original PDF file show up in a browser and the text part can be cut and pasted. The total size of the HTML and PNG files generated with the -c option tend to be roughly equivalent to that of the original PDF.


source:http://linuxpoison.blogspot.com/2010/04/13578167757589.html

- How to Configure clear and smooth fonts (subpixel rendering) in OpenSuSe Linux

Due to some patent issues, most of the distributions ship their free type packages with subpixel rendering option disabled and The subpixel hinting implementation in freetype2 might infringe Microsoft's Clear-type patents, which is why it is disabled both upstream (by the freetype2 authors) and in the freetype2 RPM packages that ship with openSUSE.

You can upgrade the freetype2 packages using 1-click-install - here and enable the subpixel option.

KDE Configuration:
Now go to Configure Desktop > Appearance > Fonts
enable the "Use anti-aliasing for fonts" and click on "Configure" button


Enable the checkbox "Use sub-pixel hinting"
Select "Medium" or "Full" from the Hinting style (the best settings is both a matter of taste and depending on your monitor, try the different hinting style options to see what suits you best).


source:http://linuxpoison.blogspot.com/2010/04/135781677514122.html

- Highlight - Convert Source Code to Formatted Text with Syntax Highlighting

Highlight converts source code to formatted text with syntax highlighting.

  * Coloured output in HTML, XHTML, RTF, TeX, LaTeX, SVG, BBCode and XML format
  * Supports 150+ programming languages
  * Includes 40 colour themes
  * Recognizes nested languages
  * CLI, GUI and Lib builds available
  * Platform independent

Installation:
OpenSuSe user can install Highlight using "1-click" installer - here

Using Highlight:
The following commands write the content of hello.c to hello.html:
highlight -o hello.html -i hello.c
highlight -o hello.html hello.c
highlight -o hello.html --syntax c < hello.c
highlight --syntax c < hello.c > hello.html
Apart from hello.html, a file highlight.css is generated in the current working directory.

Following command converts all *.cpp files in the current directory and its subdirectories to xhtml files, and stores the output in /home/you/html_code.
highlight -X  --batch-recursive '*.cpp' --outdir /home/you/html_code/
Following command converts all *.cpp files in the current directory and its sub- directories to xhtml files, and stores the output in /home/you/html_code.
highlight -L  * --outdir /home/you/latex_code/
You can generate a style file without parsing any source code.
highlight --fragment --style-outfile hilite.css
Following command prints only the CSS information to stdout (style: Seashell).
highlight -c stdout -S seashell


source:http://linuxpoison.blogspot.com/2010/04/135781677513455.html

- How to get all the required BIOS information (name, serial, version, type, etc ..) using Linux

The BIOS (Basic Input/Output System) is boot firmware, designed to be the first code run by a PC when powered on. The initial function of the BIOS is to identify, test, and initialize system devices such as the video display card, hard disk, floppy disk and other hardware. The BIOS sets the machine hardware into a known state, so that software stored on compatible media can be loaded, executed, and given control of the PC. This process is known as booting, or booting up, which is short for bootstrapping.

dmidecode is a tool for dumping a computer's DMI (some say SMBIOS ) table contents in a human-readable format. This table contains a description of the system's hardware components, as well as other useful pieces of information such as serial numbers and BIOS revision. Thanks to this table, you can retrieve this information without having to probe for the actual hardware.

The DMI table doesn't only describe what the system is currently made of, it also can report the possible evolutions (such as the fastest supported CPU or the maximal amount of memory supported).

Go to terminal and run the command : dmidecode will try to locate the DMI table. If it succeeds, it will then parse this table and display a list of records like this one:

Each record has:
  * A handle. This is a unique identifier, which allows records to reference each other. For example, processor records usually reference cache memory records using their handles.

  * A type. The SMBIOS specification defines different types of elements a computer can be made of.

  * Decoded values. The information presented of course depends on the type of record. Here, we learn about the board's manufacturer, model, version and serial number.


source:http://linuxpoison.blogspot.com/2010/04/13578167759836.html

- ninja - Monitor Linux System for Unauthorized root access

Ninja is a privilege escalation detection  and  prevention system for GNU/Linux hosts. While running, it will monitor Process activity on the local host, and keep track of  all processes  running  as root.  If a process is spawned with UID or GID zero (root), ninja will log necessary  information  about  this process, and optionally kill the process if it was spawned by an unauthorized user.

A "magic" group can be specified, allowing members of this group to run any setuid/setgid root executable.

Individual  executable  can be white-listed.  Ninja uses a fine grained white-list that lets you white list executable on  a group  and/or user basis. This can be used to allow specific groups or individual users access to  setuid/set-gid root programs, such as su and passwd.

Installation:
Download ninja from - here
Untar the source, goto the ninja directory and type following command to compile and install the ninja:
make
make install
copy the white-list file to the /etc/ninja directory
cp examples/whitelist/simple.wlist /etc/ninja/
Configuration:
Add group "ninja" (note down the group id):
groupadd ninja
Add user 'root' and all other required users to this group:
usermod -G ninja nikesh
usermod -G ninja root
Create the ninja log files:
touch /var/log/ninja.log
Open the ninja configuration file: vi /etc/ninja/default.conf and change the following settings
group=1000
daemon = yes
interval = 0
logfile = /var/log/ninja.log
whitelist = /etc/ninja/simple.wlist
external_command = /root/bin/alert
Here you also need to create a simple script alert (/root/bin/alert) with following entries

#!/bin/bash
echo 'Alert - Unauthorized Access to system.' | mail -s "'Alert - Unauthorized Access to system." njauhari@cybage.com

Edit the whitelist file located under the /etc/ninja/simple.wlist
The first field is the full path to the executable you wish to white-list. The second field  is  a comma  separated  list  of  groups  that should be granted access to the executable.  The third field is a comma separated list of users.
<executable>:<groups>:<users>
The second or third field can be left empty.  Please refer to the example whitlist located in "examples/whitelist/".

Remember that it is a good idea to whitelist programs such as passwd and other regular  setuid  applications  that users require access to.

Finally start ninja using following command:
/usr/local/bin/ninja /etc/ninja/default.conf
Testing Ninja:
Create a test user 'test'
Login to the system using this test user
now attempt to become 'root' user by typing command 'su - '
Here ninja will come into action and will kill the entire session and dump the information into the log ...


source:http://linuxpoison.blogspot.com/2010/04/135781677519066.html

- libextractor - Extracting Metadata from any types of files using Linux

GNU libextractor is a library used to extract meta data from files of arbitrary type. It is designed to use helper-libraries to perform the actual extraction, and to be trivially extendable by linking against external extractors for additional file types

Currently, libextractor supports the following formats: HTML, PDF, PS, OLE2 (DOC, XLS, PPT), OpenOffice (sxw), StarOffice (sdw), DVI, MAN, FLAC, MP3 (ID3v1 and ID3v2), NSF(E) (NES music), SID (C64 music), OGG, WAV, EXIV2, JPEG, GIF, PNG, TIFF, DEB, RPM, TAR(.GZ), ZIP, ELF, S3M (Scream Tracker 3), XM (eXtended Module), IT (Impulse Tracker), FLV, REAL, RIFF (AVI), MPEG, QT and ASF.  Also, various additional MIME types are detected.

Installation:
wget http://ftpmirror.gnu.org/libextractor/libextractor-0.6.0.tar.gz
tar xvfz libextractor-0.4.1.tar.gz
cd libextractor-0.4.1
./configure --prefix=/usr/local
make
make install
After installing libextractor, the extract tool can be used to obtain metadata from documents.

Using libextractor: 
Below is the simple example of extracting the metadata from any given FLV file


source:http://linuxpoison.blogspot.com/2010/04/135781677518871.html

- How To Hide PHP Version Information

PHP (Hypertest Preprocessor) is a server-side HTML embedded scripting language that is very popular for web development. When PHP is running on a web server, each and every request to the web server will return the following line of header with PHP version information to the browser and using this information attackers may target the specific vulnerability in that version of PHP.
X-Powered-By - PHP/5.2.6-2ubuntu4.6
So it’s recommended disable and turn php version information off. Web masters can disable version information in the php.ini file, usually located in /etc/php.ini or /etc/php5 or /etc/php4 directory.
Modify setting as follows:
expose_php = Off
display_errors=Off
register_globals = Off
Also its a good idea to send all errors to some other file (example: /var/log/php-error.log) and not on screen to end user.
Modify setting as follows:
error_log = /var/log/httpd/php-scripts-error.log
Finally after making all the above changes - Restart Apache.
/etc/init.d/httpd restart
Now all php script errors are written to /var/log/php-error.log.


source:http://linuxpoison.blogspot.com/2010/04/1357816775981.html

- Learning Web Application Security (hacking) with DVWA on Linux

Damn Vulnerable Web App (DVWA) is a PHP/MySQL web application that is damn vulnerable. Its main goals are to be an aid for security professionals to test their skills and tools in a legal environment, help web developers better understand the processes of securing web applications and aid teachers/students to teach/learn web application security in a class room environment.

DO NOT USE THIS ON A LIVE ENVIRONMENT

In its latest release (version 1.0.6), it has the following vulnerabilities :
  * SQL Injection
  * XSS Stored/Reflected
  * LFI (Local File Inclusion)
  * RFI (Remote File Inclusion)
  * Command Execution
  * Upload Script
  * Login Brute Force
  * Full Path Disclosure
  * PHP-IDS
And much more...

Installation:
Download the latest version - here
Simply unzip dvwa.zip, place the unzipped files in your public html folder, then point your browser to http://127.0.0.1/dvwa/index.php
Default username = admin
Default password = password
Database Setup
To set up the database, simply click on the Setup button in the main menu, then click on the ’Create / Reset Database’ button. This will create / reset the database for you with some data in.

If you receive an error while trying to create your database, make sure your database credentials are correct within /config/config.inc.php
$_DVWA[ 'db_user' ] = 'your_database_username';
$_DVWA[ 'db_password' ] = 'your_database_password';
$_DVWA[ 'db_database' ] = 'your_database_name';
More information, Official Web Site: DVWA

Disclaimer
We do not take responsibility for the way in which any one uses Damn Vulnerable Web App (DVWA). We have made the purposes of the application clear and it should not be used maliciously. We have given warnings and taken measures to prevent users from installing DVWA on to live web servers. If your web server is compromised via an installation of DVWA it is not our responsibility it is the responsibility of the person/s who uploaded and installed it.


source:http://linuxpoison.blogspot.com/2010/04/135781677512012.html

- Load balancing the Webserver (http/https traffic) using Pound on Linux

The Pound program is a reverse proxy, load balancer and HTTPS front-end for Web server. Pound was developed to enable distributing the load among several Web-servers and to allow for a convenient SSL wrapper for those Web servers that do not offer it natively.

WHAT POUND IS:
  * A reverse-proxy: it passes requests from client browsers to one or more back-end servers.
  * A load balancer: it will distribute the requests from the client browsers among several back-end servers, while keeping session information.
  * An SSL wrapper: Pound will decrypt HTTPS requests from client browsers and pass them as plain HTTP to the back-end servers.
  * An HTTP/HTTPS sanitizer: Pound will verify requests for correctness and accept only well-formed ones.
  * A fail over-server: should a back-end server fail, Pound will take note of the fact and stop passing requests to it until it recovers.
  * A request redirector: requests may be distributed among servers according to the requested URL.

Pound is a very small program, easily audited for security problems. It can run as setuid/setgid and/or in a chroot jail. Pound does not access the hard-disk at all (except for reading the certificate file on start, if required) and should thus pose no security threat to any machine.

Installation:
OpenSuSe user can install pound using "1-click" installer - here

Others - Download and unpack the source tarball, installation is the standard ./configure&&make&&make install. (If you plan on utilizing Pound's SSL support, specify ./configure ––with-ssl.

Look for the pound executable in /usr/local/sbin and look for the configuration file, pound.cfg, in /usr/local/etc.

Next, configure Pound. Here's a simple pound.cfg file:
ListenHTTP
Address 1.2.3.4
Port 80
Service
  Backend
    Address 192.168.0.1
    Port 80
  End
  Backend
    Address 192.168.0.2
    Port 80
  End
End
This instructs Pound to listen on the public IP address 1.2.3.4 and pass requests evenly to the two backend machines named with Service. If the machines have significantly different resources available to them, you can alter the odds of a server being chosen with the Priority directive. Values may be 1 through 9, where the value 9 means use most often, and the value 1 means least frequent. Pound balances servers dynamically: if a server goes down, Pound automatically removes the system from the pool of available servers.

Many web applications use sessions and Pound can track sessions between a client browser and the host backend server. Pound supports five techniques: client IP address, basic authentication, URL parameter, cookie value, and header value. Only one session definition is allowed per Service.

For example, to use client IP-based tracking that keeps sessions active for ten minutes, add the following to your Pound config file:
Session
  Type IP
  TTL 600
End
To harden Pound, run the daemon as a non-privileged user. To do this, use the User and Group directives to specify the user and group, respectively:
User    "nobody"
Group   "nobody"
Keep in mind that after adding Pound into your network setup, your backend servers will log the IP address of your Pound machine instead of the client IP of the person browsing your site. As a general rule, Pound passes all headers as set by the client to the backend servers, with two exceptions: Pound adds a X-Forwarded-For header, and may add information about the SSL certificate.

You can use the X-Forwarded-for header to update your logging mechanism to record the correct information.

For example, If you're using Apache combined logging, replace the letter h (remote host) with:
\"%{X-Forwarded-for}i\"


source:http://linuxpoison.blogspot.com/2010/04/135781677513160.html

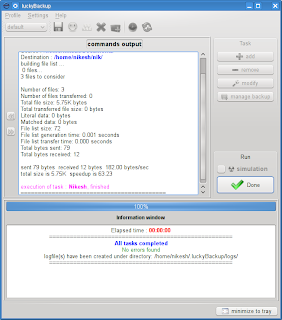
- Powerful, Fast and Reliable Backup & Sync tool - luckyBackup

LuckyBackup is a powerful, fast, reliable, and fully customizable backup and sync tool. It can backup any directory (the source) to another (the destination).

luckyBackup copies over only the changes you've made to the source directory and nothing more, saving a great deal of time for backups after the first one. Whatever changes you make to the source, including adding, moving, deleting, modifying files or directories, will have the same effect on the destination. Owner, group, time stamps, links, and permissions of files are preserved (unless directed otherwise). The synchronization feature works on any pair of directories, keeping the files that were most recently modified on both of them. It includes many safety checks to prevent accidental loss of data.

Features of LuckyBackUp
  * Easy and safe creation of a remotely located clone of your existing data. After the first backup of the source directory, LuckyBackUp will copy only the changes made. Links, permissions, time stamps, owner, and groups are preserved unless stated otherwise.
  * You can sync files between directories, it’s a handy tool if you work on more than one machine. You do not have to keep track of the last directory you modified.
  * The tool ensures data safety by first checking if the database that you have declared actually exists.
  * There are a lot of options for users tabbed as Simple and Advanced.
  * An exclude button lets you exclude any file or folder from the transfer process.
  * An only include option will let you backup only specific files, folders, and patterns within your source directory.
  * You can alter the default rsync options that LuckyBackUp provides.
  * Use remote connections either as source or destination folder.
  * Commands can be executed before or after a specific task.
  * A very handy “restore” function to undo unintentional deletes or mistakes.
  * Simulate an rsync in a dry run before actuating the actual job.
  * You can create and save multiple profiles so that you don’t have initiate a task from scratch every time you wish to perform it.
  * You can schedule tasks under already created profiles via cronjobs.
  * A logfile in your home folder records all tasks.
  * You can run the application either via the GUI or the command line.

Installation:
OpenSuSe / Fedora / CentOS user can download the LuckyBackup rpm file and can install LuckBackup using following command:
rpm -ivh luckybackup-0.3.5-1.i686.rpm
Once installed open up a terminal window and issue the command luckybackup. This command will open up the user-friendly gui where you add all of the backups you want to create.


Using LuckyBackup:

Step 1: Click the Add button
  Name: Name to give the backup.
  Type: Full or incremental.
  Source: What you want to backup.
  Destion: Directory on local or remote host to store backup.

Step 2: Click Okay to save your settings.

Step 3: Click Start to begin the backup process.

If your backup was setup correct you will immediately be informed such and, in the terminal window you can see the progress of your backup.


source:http://linuxpoison.blogspot.com/2010/04/13578167758893.html

- Monitor your Linux System with saidar

saidar is a curses-based application to display system statistics.

Statistics include CPU, processes, load, memory,swap, network I/O and disks I/O along with their free space.saidar utilizes libstatgrab library. libstatgrab is a library that provides cross platform access to statistics about the system on which it’s run. It’s written in C and presents a selection of useful interfaces which can be used to access key system statistics. The current list of statistics includes CPU usage, memory utilization, disk usage, process counts, network traffic, disk I/O, and more.

Installation:
OpenSuSe user can install saidar using "1-click" installer - here
Ubuntu user can install it using following command: sudo apt-get install saidar

Using saidar: saidar [-d delay] [-v] [-h]
If you want to use this application you can just type the following command: saidar

Now you should see the following screen which includes system statistics include CPU, processes, load, memory, swap,network I/O and disks I/O along with their free space.


source:http://linuxpoison.blogspot.com/2010/04/13578167754905.html

- Accept or Reject mail from selected Domains / Users using Sendmail

The access database file can be created to accept or reject mail from selected domains. For example, you may choose to reject all mail originating from known spammers, or to accept to relay all mail from your local network.

The /etc/mail/access file has two columns. The first lists IP addresses and domains from which the mail is coming or going. The second lists the type of action to be taken when mail from these sources or destinations is received. Keywords include RELAY, REJECT, OK (not ACCEPT), and DISCARD
spammer@aol.com         REJECT
cyberspammer.com         REJECT
192.168.212                     REJECT
spammer@aol.com         REJECT

cyberspammer2.com           550 We don't accept mail from spammers
okay.cyberspammer.com    OK
sendmail.org                         OK
128.32                                   RELAY
# You can also use the access database to block sender addresses based on
# the user name portion of the address. For example:
FREE.STEALTH.MAILER@    550 Spam not accepted
# by default we allow relaying from localhost
localhost.localdomain      RELAY
localhost                            RELAY
127.0.0.1                           RELAY
192.168.1                          RELAY
You'll then have to convert this text file into a sendmail readable database file named /etc/mail/access.db. Here are the commands you need:
makemap hash /etc/mail/access.db < /etc/mail/access


source:http://linuxpoison.blogspot.com/2010/04/135781677510056.html

Labels

Web Search Gmail Google Docs Mobile YouTube Google Maps Google Chrome User interface Tips iGoogle Social Google Reader Traffic Making Devices cpp programming Ads Image Search Google Calendar tips dan trik Google Video Google Translate web programming Picasa Web Albums Blogger Google News Google Earth Yahoo Android Google Talk Google Plus Greasemonkey Security software download info Firefox extensions Google Toolbar Software OneBox Google Apps Google Suggest SEO Traffic tips Book Search API Acquisitions InOut Visualization Web Design Method for Getting Ultimate Traffic Webmasters Google Desktop How to Blogging Music Nostalgia orkut Google Chrome OS Google Contacts Google Notebook SQL programming Google Local Make Money Windows Live GDrive Google Gears April Fools Day Google Analytics Google Co-op visual basic Knowledge java programming Google Checkout Google Instant Google Bookmarks Google Phone Google Trends Web History mp3 download Easter Egg Google Profiles Blog Search Google Buzz Google Services Site Map for Ur Site game download games trick Google Pack Spam cerita hidup Picasa Product's Marketing Universal Search FeedBurner Google Groups Month in review Twitter Traffic AJAX Search Google Dictionary Google Sites Google Update Page Creator Game Google Finance Google Goggles Google Music file download Annoyances Froogle Google Base Google Latitude Google Voice Google Wave Google Health Google Scholar PlusBox SearchMash teknologi unik video download windows Facebook Traffic Social Media Marketing Yahoo Pipes Google Play Google Promos Google TV SketchUp WEB Domain WWW World Wide Service chord Improve Adsence Earning jurnalistik sistem operasi AdWords Traffic App Designing Tips and Tricks WEB Hosting linux How to Get Hosting Linux Kernel WEB Errors Writing Content award business communication ubuntu unik